

Opera 11, the next version of the critically acclaimed web browser, packs an interesting, much wanted feature: extensions. Extensions allow users to make the web browser their own by adding features and functionality directly into the browser itself, and not as a standalone Opera Widget or Opera Unite application.
In this tutorial, you will learn the basics of developing Opera components by creating a simple extension with the same web standards we already use to build websites.
Introduction
Opera extensions are based on the W3C widget specification.
Developers can build Opera extensions with the same web stack skills they already possess (HTML, JavaScript, and CSS) to build websites and web applications. With only a few tweaks to their code, developers who have already authored a similar extension for other browsers will be able to create an Opera extension easily.
Opera has also released a supporting API to help developers build Opera extensions much more easily.
Here is a quick example of the mini Wikipedia extension:
You can create numerous different types of Opera extensions:
-
Opera toolbar button: A basic extension that adds a button to Opera's toolbar. -
Button + Popup: A button in Opera's toolbar, which, when clicked, displays a popup window with a third party URL. We will create this form of extension today. -
Button + Badge: It is often used to display a count of items, such as unread mails or messages. -
Manipulate Tabs and Windows: Opera provides developers with the ability to manipulate tabs and windows. -
A bookmarklet extension: When clicked, executes a bookmarklet function from the background process and performs it on the current tab.
Step 0: Getting Started
For today's tutorial, we'll create a simple extension that adds a Nettuts+ button to Opera's toolbar. A popup window will display when the user clicks on this button. The user can then search for articles from the Nettuts+ website directly from this popup window. In addition, there are a list of Nettuts+ tutorials.
To get started, all we require is a copy of Opera 11, and a text editor or IDE of your choice. You can download Opera 11 here.
Step 1: Creating The Extension Configuration File
First, we will create the extension configuration file, which holds the meta data describing the extension. We can specify information such as the extension's name, author and icon here.
Create an XML file named config.xml, and then add the following code to it:
1 |
|
2 |
<?xml version="1.0" encoding="utf-8" ?>
|
3 |
|
4 |
<widget xmlns="http://www.w3.org/ns/widgets"> |
5 |
<name>Nettuts+</name> |
6 |
<description>Nettuts+ Fast Search</description> |
7 |
<author href="https://tutsplus.com/authors/Fikri%20Rakala" email="address@yahoo.co.id">Fikri Rakala</author> |
8 |
<icon src="icons/Icon-64.png"/> |
9 |
</widget>
|
The <widget> element is the root element of the config.xml file. It contains four child elements (name, description, author, and icon).
- The
<name>element contains the name of the extension (Nettuts+) - The
<description>element contains the description of the extension - In the
<author>element, we enter the name of the extension's author (your name) - The
<author>element may contain two attributes:hrefandemail
In the <icon> element, we specify the location of the extension icon. The extensions manager and Opera extensions site will use this icon. Opera recommends using a 64×64 pixels icon.
Step 2: Creating the index.html File
Opera extensions require a start file, commonly called index.html. The index.html file is one of the only two mandatory parts of the extension package (the other is config.xml). This file is a bare bones HTML template with a script that creates the UI elements. The body of this document is not used.
Let's create the index.html file and then add the following script within the head of the document:
1 |
|
2 |
<script>
|
3 |
window.addEventListener("load", function() { |
4 |
var theButton; |
5 |
var ToolbarUIItemProperties = { |
6 |
title: "Nettuts+", |
7 |
icon: "icons/Nettuts-icon.png", |
8 |
popup: {href: "popup.html", width: 300, height: 200} |
9 |
}
|
10 |
theButton = opera.contexts.toolbar.createItem(ToolbarUIItemProperties); |
11 |
opera.contexts.toolbar.addItem(theButton); |
12 |
}, false); |
13 |
</script>
|
The script will create a toolbar button with a number of properties. A tooltip is created along with an 18×18 pixels icon. A popup belonging to the button is also created with a specified size, along with a reference to where the popup UI is defined. The script above will add a button to Opera''s toolbar when the extension loads.
In the ToolbarUIItemProperties object, we define the properties of the button. There are five properties that we can pass to the ToolbarUIItemProperties. The five properties are as follows:
-
disabled. This specifies whether the button is enabled or not. It is true (disabled) by default and accepts a boolean value. -
title. This property definess the tooltip that is shown when the user hovers over the button. -
icon. This property defines the icon used on the button. If you supply a size other than 18×18 pixels, it will scale the image to fit that size. -
onclick. The function to execute when a user clicks on the button. We do not use this property on this extension. -
onremove. The function to execute when the button is removed from the ToolbarContext. We also do not use this property.
After we've defined the properties of the button in the ToolbarUIItemProperties object, we create the actual button and apply the properties by using the createItem method:
1 |
|
2 |
theButton = opera.contexts.toolbar.createItem(ToolbarUIItemProperties); |
Finally, we add the button to Opera's toolbar by using the addItem method:
1 |
|
2 |
opera.contexts.toolbar.addItem(theButton); |
Here is the complete code of the index.html file:
1 |
|
2 |
<!DOCTYPE html>
|
3 |
<html lang="en"> |
4 |
<head>
|
5 |
<script>
|
6 |
window.addEventListener("load", function() |
7 |
{
|
8 |
var theButton; |
9 |
var ToolbarUIItemProperties = { |
10 |
title: "Nettuts+", |
11 |
icon: "icons/icon.png", |
12 |
popup: {href: "popup.html", width: 300, height: 200} |
13 |
}
|
14 |
theButton = opera.contexts.toolbar.createItem(ToolbarUIItemProperties); |
15 |
opera.contexts.toolbar.addItem(theButton); |
16 |
}, false); |
17 |
</script>
|
18 |
|
19 |
</head>
|
20 |
<body>
|
21 |
|
22 |
</body>
|
23 |
</html>
|
Step 3: Creating the Popup Window
In step two, above, when we created the index.html file, we defined the properties (the location and window's size) of the popup object within the ToolbarUIItemProperties object. This time, we only need to create the content of the popup window. This is just a HTML document, with its viewport set to the specified size. We can use HTML, CSS, JavaScript or any other web technology that we normally use on a web page.
Create a file called popup.html, and then add the following elements into the body:
1 |
|
2 |
<input id="Text1" type="text" style="width: 170px" /> |
3 |
<input id="Button1" type="button" value="Search" onclick="SearchonNettutsplus()" /> |
4 |
|
5 |
<ul>
|
6 |
<li><a href="https://code.tutsplus.com" target="_blank">Home</a> </li> |
7 |
<li><a href="https://code.tutsplus.comcategory/tutorials/asp-net/" target="_blank">ASP.NET</a></li> |
8 |
<li><a href="https://code.tutsplus.comcategory/tutorials/cmss/" target="_blank">CMSs</a></li> |
9 |
<li><a href="https://code.tutsplus.comcategory/tutorials/databases/" |
10 |
target="_blank">Databases</a> </li> |
11 |
<li><a href="https://code.tutsplus.comcategory/tutorials/design-tutorials/" |
12 |
target="_blank">Design</a> </li> |
13 |
<li><a href="https://code.tutsplus.comcategory/tutorials/html-css-techniques/" |
14 |
target="_blank">HTML & CSS</a> </li> |
15 |
<li><a href="https://code.tutsplus.comcategory/tutorials/javascript-ajax/" |
16 |
target="_blank">JavaScript & AJAX</a> </li> |
17 |
<li><a href="https://code.tutsplus.comcategory/tutorials/php/" target="_blank">PHP</a></li> |
18 |
<li><a href="https://code.tutsplus.comcategory/tutorials/ruby/" target="_blank">Ruby</a></li> |
19 |
<li><a href="https://code.tutsplus.comcategory/tutorials/site-builds/" target="_blank">Site Builds</a></li> |
20 |
<li><a href="https://code.tutsplus.comcategory/tutorials/tools-and-tips/" target="_blank">Tools & Tips</a> </li> |
21 |
<li><a href="https://code.tutsplus.comcategory/tutorials/wordpress/" target="_blank">Wordpress</a></li> |
22 |
<li><a href="https://code.tutsplus.comcategory/tutorials/other/" target="_blank">Other</a> </li> |
23 |
</ul>
|
Please note that we're using the onclick attribute here only for convenience's sake.
To control the style of the popup window, we add the following stylesheet into the head of the document:
1 |
|
2 |
<style> |
3 |
body { |
4 |
line-height :1.5em; |
5 |
}
|
6 |
|
7 |
h1 { |
8 |
font-family :Arial, Verdana ; |
9 |
font-size :1em; |
10 |
}
|
11 |
|
12 |
ul { |
13 |
list-style-type:none; |
14 |
margin:0; |
15 |
padding:0; |
16 |
}
|
17 |
|
18 |
li { |
19 |
display:inline; |
20 |
margin-right :10px; |
21 |
}
|
22 |
</style> |
Next, we add a JavaScript function into the head of the document to handle the Button1 click event:
1 |
|
2 |
<script"> |
3 |
function SearchonNettutsplus() { |
4 |
// Get Text1 value
|
5 |
var search = escape(document.getElementById("Text1").value) ; |
6 |
|
7 |
// Search articles on Nettuts+ and show the result on new window
|
8 |
window.open("https://code.tutsplus.com?s=" + search); |
9 |
}
|
10 |
</script>
|
Here is the completed code for the popup.html document:
1 |
|
2 |
<!DOCTYPE html>
|
3 |
<html lang="en"> |
4 |
<head>
|
5 |
<title>Nettuts+</title> |
6 |
<style>
|
7 |
body { |
8 |
line-height :1.5em; |
9 |
}
|
10 |
|
11 |
h1 { |
12 |
font-family :Arial, Verdana ; |
13 |
font-size :1em; |
14 |
}
|
15 |
|
16 |
ul { |
17 |
list-style-type:none; |
18 |
margin:0; |
19 |
padding:0; |
20 |
}
|
21 |
|
22 |
li { |
23 |
display:inline; |
24 |
margin-right :10px; |
25 |
}
|
26 |
</style>
|
27 |
|
28 |
<script>
|
29 |
function SearchonNettutsplus() { |
30 |
// Get Text1 value
|
31 |
var search = escape(document.getElementById("Text1").value) ; |
32 |
|
33 |
// Search articles on Nettuts+ and show the result on new window
|
34 |
window.open("https://code.tutsplus.com?s=" + search); |
35 |
}
|
36 |
</script>
|
37 |
|
38 |
</head>
|
39 |
<body>
|
40 |
<input id="Text1" type="text" style="width: 170px" /> |
41 |
<input id="Button1" type="button" value="Search" onclick="SearchonNettutsplus()" /> |
42 |
<br /><br /> |
43 |
|
44 |
<ul>
|
45 |
<li><a href="https://code.tutsplus.com" target="_blank">Home</a> </li> |
46 |
<li><a href="https://code.tutsplus.comcategory/tutorials/asp-net/" target="_blank">ASP.NET</a></li> |
47 |
<li><a href="https://code.tutsplus.comcategory/tutorials/cmss/" target="_blank">CMSs</a></li> |
48 |
<li><a href="https://code.tutsplus.comcategory/tutorials/databases/" |
49 |
target="_blank">Databases</a> </li> |
50 |
<li><a href="https://code.tutsplus.comcategory/tutorials/design-tutorials/" |
51 |
target="_blank">Design</a> </li> |
52 |
<li><a href="https://code.tutsplus.comcategory/tutorials/html-css-techniques/" |
53 |
target="_blank">HTML & CSS</a> </li> |
54 |
<li><a href="https://code.tutsplus.comcategory/tutorials/javascript-ajax/" |
55 |
target="_blank">JavaScript & AJAX</a> </li> |
56 |
<li><a href="https://code.tutsplus.comcategory/tutorials/php/" target="_blank">PHP</a></li> |
57 |
<li><a href="https://code.tutsplus.comcategory/tutorials/ruby/" target="_blank">Ruby</a></li> |
58 |
<li><a href="https://code.tutsplus.comcategory/tutorials/site-builds/" target="_blank">Site Builds</a></li> |
59 |
<li><a href="https://code.tutsplus.comcategory/tutorials/tools-and-tips/" target="_blank">Tools & Tips</a> </li> |
60 |
<li><a href="https://code.tutsplus.comcategory/tutorials/wordpress/" target="_blank">Wordpress</a></li> |
61 |
<li><a href="https://code.tutsplus.comcategory/tutorials/other/" target="_blank">Other</a> </li> |
62 |
</ul>
|
63 |
|
64 |
</body>
|
65 |
</html>
|
Step 4: Packaging and Installing the Extension
Our extension is now finished! All that's left to do is to select all the files and zip them up. Once that is done, we can rename the zip file to Nettutsplus.oex (remember to replace the .zip extension with .oex) and we are done.
At this point, we can upload our extension to http://addons.labs.opera.com/.
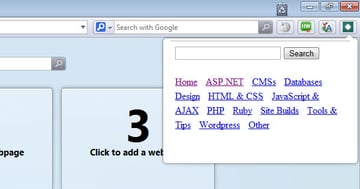
To install it as a regular user, simply drag the extension (Nettutsplus.oex) into Opera, and it will ask you if you want to install it. After installing it, you will find the Nettuts+ button in Opera's toolbar.
Here is the Nettuts+ extension running on Opera 11:
Conclusion
Opera extensions can vary from simple to extremely complex. After working along with this tutorial, I hope that you now possess the basic knowledge behind the process of creating Opera extensions. For more information about developing Opera extensions, please refer to the guide and documentation that is provided by Opera.
Happy Coding!


